多读书多实践,勤思考善领悟

JavaFX Layout BorderPane(布局边框面板)

本文于1661天之前发表,文中内容可能已经过时。

如果我们使用BorderPane,则节点将排列在Top,Left,Right,Bottom和Center位置。

名为类BorderPane包的javafx.scene.layout代表BorderPane。

该类包含五个属性,包括 -

  • bottom - 此属性属于Node类型,它表示放置在BorderPane底部的节点。您可以使用setter方法setBottom()为此属性设置值。
  • center - 此属性是Node类型,它表示放置在BorderPane中心的节点。您可以使用setter方法setCenter()为此属性设置值。
  • left - 此属性是Node类型,它表示放置在BorderPane左侧的节点。您可以使用setter方法setLeft()为此属性设置值。
  • right - 此属性属于Node类型,它表示位于BorderPane右侧的节点。您可以使用setter方法setRight()为此属性设置值。
  • top - 此属性是Node类型,它表示放置在BorderPane顶部的节点。您可以使用setter方法setTop()为此属性设置值。

除此之外,本课程还提供以下方法 -

  • setAlignment() - 此方法用于设置属于此窗格的节点的对齐方式。此方法接受节点和优先级值。

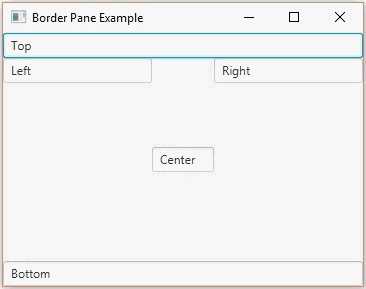
以下程序是BorderPane布局的示例。在此,我们在顶部,底部,右侧,左侧和中心位置插入五个文本字段。

将此代码保存在名为BorderPaneExample.java的文件中。

1
2
3
4
5
6
7
8
9
10
11
12
13
14
15
16
17
18
19
20
21
22
23
24
25
26
27
28
29
30
31
32
33
34
35
36
import javafx.application.Application; 
import javafx.collections.ObservableList;
import javafx.scene.Scene;
import javafx.scene.control.TextField;
import javafx.scene.layout.BorderPane;
import javafx.stage.Stage;

public class BorderPaneExample extends Application {
@Override
public void start(Stage stage) {
//Instantiating the BorderPane class
BorderPane bPane = new BorderPane();

//Setting the top, bottom, center, right and left nodes to the pane
bPane.setTop(new TextField("Top"));
bPane.setBottom(new TextField("Bottom"));
bPane.setLeft(new TextField("Left"));
bPane.setRight(new TextField("Right"));
bPane.setCenter(new TextField("Center"));

//Creating a scene object
Scene scene = new Scene(bPane);

//Setting title to the Stage
stage.setTitle("BorderPane Example");

//Adding scene to the stage
stage.setScene(scene);

//Displaying the contents of the stage
stage.show();
}
public static void main(String args[]){
launch(args);
}
}

使用以下命令从命令提示符编译并执行保存的java文件。

1
2
javac BorderPaneExample.java 
java BorderPaneExample

执行时,上面的程序生成一个JavaFX窗口,如下所示。

BorderPane