一.安装Prism
1.使用程序包管理控制台
1
| Install-Package Prism.Unity
|
2.使用管理解决方案的Nuget包
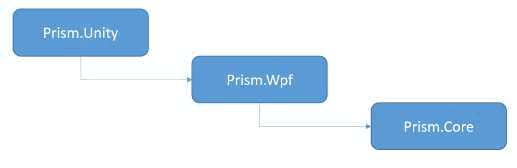
为啥安装prism会跟Prism.Unity有关系,我们知道Unity是个IOC容器,而Prism本身就支持IOC,且目前官方支持几种IOC容器:

1.且unity由于是微软官方的,且支持prism的组件化,由此我推荐使用prism.unity,在官方文档中prism7不支持prism.Mef,Prism 7.1将不支持prism.Autofac
2.安装完prism.unity就已经包含着所有prism的核心库了,架构如下:
二.实现数据绑定
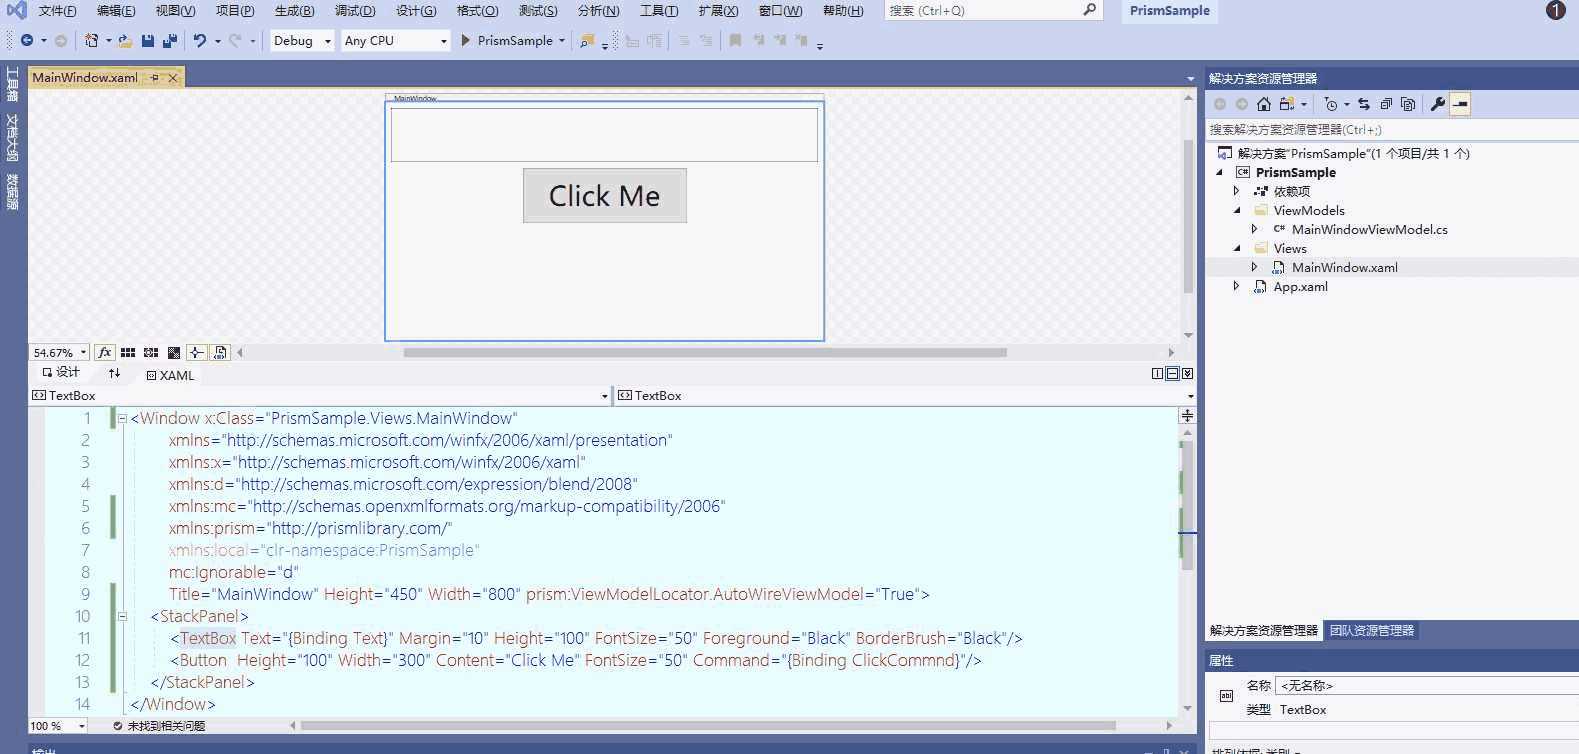
我们先创建Views文件夹和ViewModels文件夹,将MainWindow放在Views文件夹下,再在ViewModels文件夹下面创建MainWindowViewModel类,如下:
xmal代码如下:
1
2
3
4
5
6
7
8
9
10
11
12
13
14
| <Window x:Class="PrismSample.Views.MainWindow"
xmlns="http://schemas.microsoft.com/winfx/2006/xaml/presentation"
xmlns:x="http://schemas.microsoft.com/winfx/2006/xaml"
xmlns:d="http://schemas.microsoft.com/expression/blend/2008"
xmlns:mc="http://schemas.openxmlformats.org/markup-compatibility/2006"
xmlns:prism="http://prismlibrary.com/"
xmlns:local="clr-namespace:PrismSample"
mc:Ignorable="d"
Title="MainWindow" Height="450" Width="800" prism:ViewModelLocator.AutoWireViewModel="True">
<StackPanel>
<TextBox Text="{Binding Text}" Margin="10" Height="100" FontSize="50" Foreground="Black" BorderBrush="Black"/>
<Button Height="100" Width="300" Content="Click Me" FontSize="50" Command="{Binding ClickCommnd}"/>
</StackPanel>
</Window>
|
ViewModel代码如下:
1
2
3
4
5
6
7
8
9
10
11
12
13
14
15
16
17
18
19
20
21
22
23
24
25
26
27
28
29
| using Prism.Commands;
using Prism.Mvvm;
namespace PrismSample.ViewModels
{
public class MainWindowViewModel:BindableBase
{
private string _text;
public string Text
{
get { return _text; }
set { SetProperty(ref _text, value); }
}
private DelegateCommand _clickCommnd;
public DelegateCommand ClickCommnd =>
_clickCommnd ?? (_clickCommnd = new DelegateCommand(ExecuteClickCommnd));
void ExecuteClickCommnd()
{
this.Text = "Click Me!";
}
public MainWindowViewModel()
{
this.Text = "Hello Prism!";
}
}
}
|
启动程序
可以看到,我们已经成功的用prism实现数据绑定了,且View和ViewModel完美的前后端分离
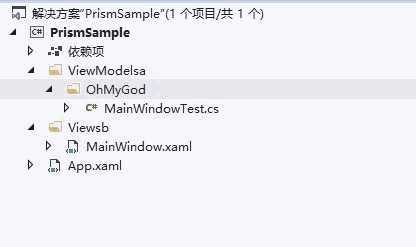
但是现在我们又引出了另外一个问题,当我们不想按照prism的规定硬要将View和ViewModel放在Views和ViewModels里面,又或许自己的项目取名规则各不相同怎么办,这时候就要用到另外几种方法:
1.更改命名规则
如果,公司命名规则很变态,导致项目结构变成这样(这种公司辞职了算了):
首先我们在App需要引入prism,修改‘Application’为‘prism:PrismApplication’且删除StartupUri
xmal代码如下:
1
2
3
4
5
6
7
8
9
| <prism:PrismApplication x:Class="PrismSample.App"
xmlns="http://schemas.microsoft.com/winfx/2006/xaml/presentation"
xmlns:x="http://schemas.microsoft.com/winfx/2006/xaml"
xmlns:prism="http://prismlibrary.com/"
xmlns:local="clr-namespace:PrismSample">
<Application.Resources>
</Application.Resources>
</prism:PrismApplication>
|
cs后台代码如下:
1
2
3
4
5
6
7
8
9
10
11
12
13
14
15
16
17
18
19
20
21
22
23
24
25
26
27
28
29
30
31
32
33
34
35
36
37
38
39
40
| using Prism.Unity;
using Prism.Ioc;
using Prism.Mvvm;
using System.Windows;
using PrismSample.Viewsb;
using System;
using System.Reflection;
namespace PrismSample
{
public partial class App : PrismApplication
{
protected override Window CreateShell()
{
return Container.Resolve<MainWindow>();
}
protected override void RegisterTypes(IContainerRegistry containerRegistry)
{
}
protected override void ConfigureViewModelLocator()
{
base.ConfigureViewModelLocator();
ViewModelLocationProvider.SetDefaultViewTypeToViewModelTypeResolver((viewType) =>
{
var viewName = viewType.FullName.Replace(".Viewsb.", ".ViewModelsa.OhMyGod.");
var viewAssemblyName = viewType.GetTypeInfo().Assembly.FullName;
var viewModelName = $"{viewName}Test, {viewAssemblyName}";
return Type.GetType(viewModelName);
});
}
}
}
|
上面这两句是关键:
“.Viewsb.” 表示View所在文件夹namespace,”.ViewModelsa.OhMyGod.” 表示ViewModel所在namespace
1
| var viewName = viewType.FullName.Replace(".Viewsb.", ".ViewModelsa.OhMyGod.");
|
Test表示ViewModel后缀
1
| var viewModelName = $"{viewName}Test, {viewAssemblyName}";
|
2.自定义ViewModel注册
我们新建一个Foo类作为自定义类,代码如下:
1
2
3
4
5
6
7
8
9
10
11
12
13
14
15
16
17
18
19
20
21
22
23
24
25
26
27
28
29
30
| using Prism.Commands;
using Prism.Mvvm;
namespace PrismSample
{
public class Foo:BindableBase
{
private string _text;
public string Text
{
get { return _text; }
set { SetProperty(ref _text, value); }
}
public Foo()
{
this.Text = "Foo";
}
private DelegateCommand _clickCommnd;
public DelegateCommand ClickCommnd =>
_clickCommnd ?? (_clickCommnd = new DelegateCommand(ExecuteClickCommnd));
void ExecuteClickCommnd()
{
this.Text = "Oh My God!";
}
}
}
|
修改App.cs代码:
1
2
3
4
5
6
7
8
9
10
11
12
| protected override void ConfigureViewModelLocator()
{
base.ConfigureViewModelLocator();
ViewModelLocationProvider.Register<MainWindow, Foo>();
}
|
运行.
就算是不注释修改命名规则的代码,我们发现运行结果还是一样,因此我们可以得出结论,
这种直接的,不通过反射注册的自定义注册方式优先级会高点,在官方文档也说明这种方式效率会高点
且官方提供4种方式,其余三种的注册方式如下:
1
2
3
| ViewModelLocationProvider.Register(typeof(MainWindow).ToString(), typeof(MainWindowTest));
ViewModelLocationProvider.Register(typeof(MainWindow).ToString(), () => Container.Resolve<Foo>());
ViewModelLocationProvider.Register<MainWindow>(() => Container.Resolve<Foo>());
|
三.源码
本篇源代码:PrismSample源码